Self-Hosted Retro Gaming: RetroAssembly via Docker. Play your retro game collection on your Steam Deck
I recently discovered RetroAssembly, a self-hosted retro game emulator that runs entirely in a web browser. It features game saves and supports multiple accounts. Perfect for families where every user wants their own progression.
Deploying RetroAssembly on my home server via Docker was easy. The official site provides documentation and a `compose.yaml` example, which I was able to adapt to my environment.
In this post, I'll walk you through setting up RetroAssembly using Docker, highlight some of its features, and show you how to optimize the experience on a Steam Deck using a custom bash script and kiosk mode.
This tutorial assumes you have a functional Docker environment and are comfortable using the command line.
First, create a dedicated directory for the project and navigate into it:
mkdir -p ~/docker/retroassembly && cd ~/docker/retroassembly
Next, create a docker-compose.yml file using your preferred text editor and add the following configuration:
services:
    retroassembly:
        image: arianrhodsandlot/retroassembly
        ports: [8088:8000]
        volumes: [/var/lib/docker/volumes/retroassembly/_data:/app/data]
        restart: unless-stopped
- Volumes: The path
/var/lib/docker/volumes/retroassembly/_dataensures your game data and library metadata persist between container updates. Adjust this to a persistent path on your host. - Ports: I mapped host port
8088to container port8000. You will use this port to access the web interface.
With the file saved, launch the service in detached mode:
docker compose up -d
Once the container is active, you can access the web interface at http://your-server-ip:8088/.
On your first visit, you will be prompted to create a username and password.
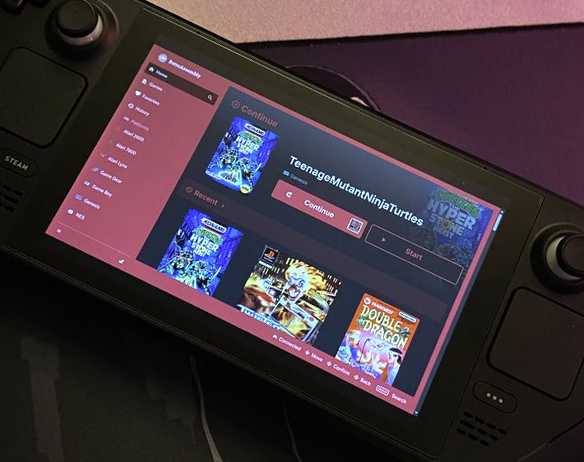
The RetroAssembly UI comes with several consoles enabled by default. You can manage your library by clicking the settings icon in the lower-left corner and navigating to the Library tab.
To add games, simply select a console from the left menu and click the Add button. This allows you to upload ROMs directly through the web UI, which is much more convenient than manually organizing directories and file permissions on the server backend as required by many other emulator front-ends.
Once your ROMs are uploaded, RetroAssembly automatically fetches metadata, including box art, game descriptions, and even YouTube gameplay previews. This data is pulled dynamically from libretro.com, so it doesn't consume extra storage on your server.
For a better experience, I have a few personal preferences: In Settings > Inputs, I set the controller layout to Xbox Style for broad gamepad compatibility. Under Settings > Emulating > Video, I enabled the crt-easymode shader for that classic CRT look and turned on Go fullscreen on launch.
RetroAssembly also supports multiple profiles. You can create and manage separate accounts for friends or family under the Settings > General tab, ensuring everyone has their own dedicated save files and progress.
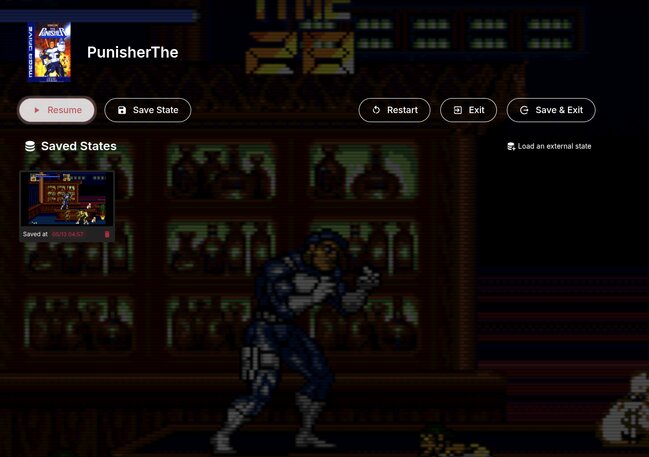
During gameplay, pressing the LB + RB bumpers together opens a menu overlay. This allows you to create save states, load previous progress, or jump back to your library on the fly.
Adding RetroAssembly as a non-steam game on the Steam Deck
Adding a web app as a "Non-Steam Game" is a way to integrate external tools and apps into your Steam Deck library. This provides full controller support and allows you to launch the app directly from Gaming Mode. Since we are using the Chromium Flatpak, we'll need a small wrapper script to bridge the gap between Steam and the Flatpak environment.
Here is the step-by-step process to set up a dedicated kiosk-style launcher for your local retro library:
Create a bash Script
First, we need a script that Steam can execute to launch a instance of the Chromium browser.
- Switch to Desktop Mode on your Steam Deck.
- Open the Dolphin file manager.
- Navigate to your home directory:
/home/deck. - Create a new folder named
scripts(if it doesn't exist).
Inside that folder, create a new text file named retroassembly-kiosk.sh.
Right-click the file, select Open With, and choose Kate (or your preferred text editor).
Paste the following content into the file: (This example uses the Chromium Browser)
#!/bin/bash

# Flatpak application
FLATPAK_APP="org.chromium.Chromium"

# Kill existing instance of (FLATPAK_APP)
flatpak kill "$FLATPAK_APP" 2>/dev/null

# Set Flatpak user permissions
flatpak override --user --filesystem=/run/udev:ro "$FLATPAK_APP"

# Launch Chromium with arguments
flatpak run "$FLATPAK_APP" --app="http://your-server-ip:8088/library" --kiosk --no-first-run --noerrdialogs
After saving the file and closing the editor, you must make the script executable:
- Right-click
retroassembly-kiosk.shand select Properties. - Navigate to the Permissions tab.
- Check the box labeled Is executable.
- Close the properties window.
Add to Steam Library
Finally, we need to add the script to your Steam library so it can be launched directly from Gaming Mode.
- Open the Steam client while still in Desktop Mode.
- Click Games in the top menu bar and select Add a Non-Steam Game to My Library....
- In the window that appears, click the Browse... button at the bottom.
- Navigate to
/home/deck/scripts/. - Select
retroassembly-kiosk.shand click Open. - Ensure the script is checked in the list and click Add Selected Programs.
Configure Launch Options
To ensure the best performance and input reliability, I recommend disabling the Steam Overlay for this specific shortcut:
- Switch back to Gaming Mode.
- Locate the retroassembly-kiosk.sh entry in your library.
- Press the Menu button (the button with three horizontal lines).
- Navigate to Properties > General.
- Toggle off Enable the Steam Overlay while in-game.
Note: Disabling the overlay prevents potential focus issues and ensures that the browser in kiosk mode captures your controller inputs without interference.
Launch and Test
Return to Gaming Mode and launch your new RetroAssembly shortcut. The application should open immediately in full-screen kiosk mode, connecting directly to your server.
Since the Steam Deck's native resolution is 1280x800, the --window-size flag we included in the script ensures the interface renders perfectly without any scaling artifacts or letterboxing.
Your setup is now complete. You can launch RetroAssembly from any browser, giving you a seamless, console-like experience for your self-hosted game collection. RetroAssembly also has a nice mobile experience with on-screen buttons. Try it from your phone or anything that has a web browser.